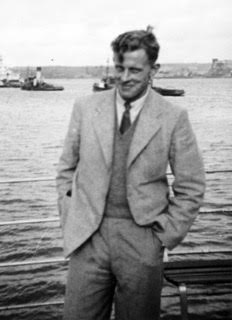
WW2 75 – 7 January 1941 – ‘Their only son’: Second Lieutenant John Francis Burkinshaw Martin (1921-41) 51st (The Westmorland and Cumberland Yeomanry) Field Regiment
Continued from 20 October 1940:
A
Budleigh Burial in 1940: Corporal Harry Goulty (1898-1940) The Buffs (Royal
East Kent Regiment)

Only
by chance did I see mention of John on one of the sides of the pedestal which marks his parents’ distinctive grave in Budleigh Salterton’s St Peter’s Burial
Ground. It seemed a shame that lichen and a few
tufts of grass should continue to obscure his memory, even though his own grave
is far away in North Africa. And I was intrigued by the story of yet another child
of a Budleigh resident who was also a high-ranking army officer, and, like so
many other former Budleigh residents, born in India. So here is John’s story.

He
was the son of Major General Kevin Martin DSO and his wife Hilda Martin, née
Burkinshaw. Major General Martin was still a serving officer at the time of
John’s death, living with Hilda at Forest Row in Sussex.
Kevin Martin had had a brilliant military career, gaining his Distinguished Service Order in 1914 while fighting in France, and going on to be mentioned five times in despatches during WW1. In 1920, he was made an officer of the French Légion d’Honneur.
Various staff appointments had followed, including military attache posts in Paris and Warsaw, and from 1942-45 he was Aide-de-Camp to King George VI.

Engraving of Beaumont College, Old Windsor, Berkshire, by John Preston Neale (circa 1830) Image credit: Wikipedia
The son was clearly following in his father’s footsteps. Major General Martin and his wife were Roman Catholics, and like his father, John was educated at the Catholic boarding school Beaumont College, at Old Windsor, just outside Windsor itself.

This memorial commemorates the former pupils of Beaumont College who were killed or missing in the two world wars Image credit: www.tracesofwar.com
The
College closed some years ago, but former pupils have posted records online,
including tributes to those who fell in two world wars, and I was pleased to
find some details online about John.
I am also grateful to former Beaumont College pupil Robert Wilkinson for extracting further information from the archives.
It appears that John spent the year 1932 at St John’s, the nearby prep school before going up to the College in September the following year. He was obviously quite bright, going up the school in the ‘A’ stream and became a member of Rhetoric in his final year. Rhetoric, explained Robert Wilkinson, was listed as a class but in reality, one was appointed, rather similar to ‘Pop’ at Eton and usually academic rather than sporting.
John was also one of about four or five
Sub-Captains. Apart from that he played in the 2nd XV rugby for two seasons and
was stroke of the 2nd VIII in rowing. He was a first class shot and was one of
the two Under Officers commanding a Company in the Officers’ Training Corps (OTC).
He did not appear to have been an actor or chorister but was in one of the
debating Societies.
John left school in 1938, and again, like his father, entered the Royal Military Academy, Woolwich, being commissioned as an officer in the Royal Regiment of Artillery the following year. His Service Number was 105897.

The Royal Military Academy, Woolwich Image credit: Wikipedia
Located in south-east London, the RMA Woolwich trained officers of the Royal
Artillery and Royal Engineers. John’s father was a member of the Royal
Engineers, but now John chose a different path.

A Royal Artillery cap badge
The Royal Artillery had gone through various changes in the early 20th century. In 1899, it had been split into three arms - the Royal Field Artillery (RFA), the Royal Horse Artillery (RHA) and the Royal Garrison Artillery (RGA).
The RHA provided artillery support to the cavalry and continued in a separate role. The RFA was the largest branch, providing howitzers and medium artillery near the front line. The RGA manned the largest guns, especially those mounted in coastal and colonial forts.
During the First World War (1914-18), the RGA also manned the heavy guns and howitzers on the Western Front. In 1924, the RFA and RGA were merged back into one regiment, the Royal Artillery. This was divided into brigades, which were renamed regiments in 1938.
There were 960 of these regiments during the Second World War (1939-45), with over one million men.
John was posted to the 51st (Westmorland & Cumberland) Field Regiment. This Territorial Army (TA) Regiment originally consisted of 203rd (Cumberland) and 370th (Cumberland Yeomanry) Batteries, and was initially part of 42nd (East Lancashire) Division.
The regiment was formed in 1920 by the conversion
of the Westmorland and Cumberland Yeomanry. It was based at Carlisle where the
HQ and 370th Batteries were located, with the 203rd Battery being based at
Whitehaven.

Map of Norway showing Narvik
Many regiments had been sent to France as part of
the British Expeditionary Force (BEF) at the outbreak of war in September 1939.
However the Scandinavian countries were also seen as a potential area of
conflict. Along with Sweden, Norway and Denmark had declared for neutrality,
but Germany’s access to iron ore – vital for its war economy – via the Norwegian port of Narvik was a cause
of concern for Britain.
The official approval for the invasion and occupation of Denmark and Norway was signed by Hitler on 1 March. Just over a month later, on 8 April, German naval and ground forces began invading the two countries. The following day saw the First Battle of Narvik, when Budleigh man Frederick William Richards lost his life on HMS Hunter, as you can read here. The Norwegian campaign – an Allied attempt to repulse Nazi forces – had begun.
British ground forces were sent to strategic areas across Norway from mid-April to early June. Along with the 203rd Battery, John sailed across the North Sea and arrived in Norway on 22 April.

Royal Artillery gunners from Exeter, preparing a 40mm Bofors anti-aircraft gun in Norway, May 1940 Collection of Imperial War Museums
The 203rd Battery was part of Avon Force, later to be renamed Rupert Force and also known as the North Western Expeditionary Force. It was based on operations in the Narvik area of Norway and was under the command of Major General Pierse ‘Pat’ Mackesy. The overall commander was Admiral of the Fleet the Earl of Cork and Orrery.
Supported by the Royal Air Force and ships of the
Royal Navy, including the aircraft carrier Ark Royal, John’s 203rd
Battery fought alongside many other units in the attempt to retake Narvik. They
included Anti-Aircraft Batteries from the Royal Artillery and Field Companies
of the Royal Engineers, as well as the 24th (Guards) Brigade. French
and Polish troops were also involved.
The Norwegian campaign had some successes, but ultimately was clearly doomed to failure. Mackesy had enraged Churchill by refusing to commit his troops to 'the sheer bloody murder' of what was talked about as an 'arctic Gallipoli' – a stinging reminder of the British failure to invade the Dardanelles in WW1. He was recalled home and, amidst Churchillian complaints of his 'feebleness and downright cowardice', was spared a court martial but never held command again.
In May 1940 Lieutenant General Claude Auchinleck took over command of the Allied ground forces in Norway, but a shortage of equipment hampered operations. On 14 May, Auchinleck told London that he needed 104 x 3.7-inch guns and 96 x 40mm guns to hold Narvik and Tromsø, the latter having been added to the commitments. The Chiefs of Staff allowed him only 48 Heavy Anti-Aircraft and 72 Light Anti-Aircraft guns.

British
troops returning from Norway to Greenock, Scotland, on board a transport boat. Image
credit: H. Marshall Bishop, War Office official photographer. Photograph N 383
from the collections of the Imperial War Museums.
By the end of the month, British
troops were being evacuated by warships. John and his Regiment were evacuated
to Scotland. The main evacuation from Narvik and Harstad commenced on 2 June
1940 in a major operation undertaken by the Royal Navy. The last to leave boarded HMS Southampton
on about 8 June.
The greatest loss in the campaign was that of the aircraft carrier HMS Glorious and her two escorting destroyers, HMS Acasta and HMS Ardent, on 8 June. You may have read about Lieutenant Cyril Howlett, who was serving on HMS Glorious when he was lost: the account is here

Egypt & Cyrenaica, Libya: Map of the
Western Desert Campaign and its Operation Compass Battle Area December 1940 to
February 1941 Image credit: Stephen Kirrage
John next served in a very different theatre of war. Italy had declared war on Britain and France on 10 June 1940, following which various naval skirmishes took place in the Mediterranean.
On 13 September, the Italian 10th Army advanced into Egypt. Lieutenant-General Sir Henry Maitland Wilson, Commander of British forces in Egypt, was ordered to push the Italians back in what was called Operation Compass. John and his regiment sailed for North Africa, and were attached to the 6th Australian Division Artillery which was in need of reinforcements.

A 25-pounder artillery gun and crew at work in the Western Desert during WW2 Image credit: Wikipedia
John’s 51st Field Regiment provided extra fire power for the Australians, with 24 25-pounder artillery guns, in addition to the 28 25-pounder guns of the
104th (Essex Yeomanry) Regiment and F Battery of the Royal Horse Artillery.
There were also two anti-tank regiments, the 3rd and 106th Regiments of the Royal
Horse Artillery, equipped with 2-pounders and Bofors 37 mm guns.
The operation, which began on 9 December, was originally planned as a five-day raid but consideration was given to extending it, depending on the results. In the event, it lasted until 9 February 1941.

Gloster
Gladiator biplane aircraft from No. 3 Squadron Royal Australian Air Force
(RAAF), returning to a landing ground near Sallum, after a patrol over Bardia during
Operation Compass. The squadron's mobile
operations room is in the left foreground. Image credit: H. Hensser, Royal Air
Force official photographer
At the beginning of January, the 6th Australian Division under Major General Iven Mackay assaulted the strongly held Italian fortress of Bardia on the Libyan coast, assisted by air support and naval gunfire and under the cover of an artillery barrage. The result was a decisive Allied victory when the fortress fell on 5 January.

Troops from the Australian 2/2nd Infantry Battalion rush through the streets of Bardia. Image credit: Australian War Museum
The Australian official historian, Gavin Long, considered the Battle of Bardia ‘a victory for bold reconnaissance, for audacious yet careful planning, for an artillery scheme which subdued the enemy's fire at the vital time, and a rapid and continuing infantry assault which broke a gap in the enemy's line.’ Italian losses were considerable, with 1,703 killed, 3,740 wounded and 36,000 captured. On the Allied side, 130 were killed and 326 wounded.
But Major General Martin and his wife Hilda were devastated to learn that their only son was among the casualties, and that he had died on 7 January.

Halfaya Sollum War Cemetery Image credit: CWGC
John’s grave is in Halfaya Sollum War Cemetery, on
the main coast road from Mersa Matruh through to Libya, approximately 12
kilometres from the Egypt/Libya border.
The next post is for Private Francis Ernest Newcombe (1910-41), who died while serving in the 8th Battalion, Devonshire Regiment.
You can read about him at https://budleighpastandpresent.blogspot.com/2023/12/ww2-75-april-1941-uses-of-census.html


Comments
Post a Comment